Home
Guide Services
Schools & Instruction
Tips & Techniques
Useful Links
Weather &
Water
Photo Gallery
Fly Patterns
Book Reviews
Tall Tales
|
Here are fly fishing and fly tying techniques that can make your days on the water more productive and more enjoyable
Index
|
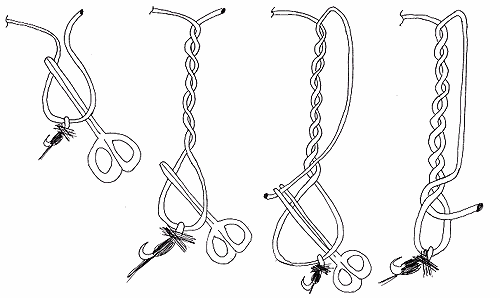
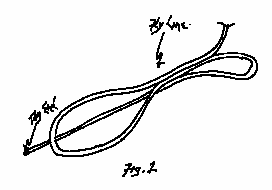
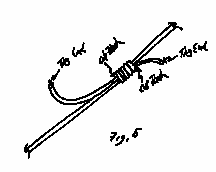
King Sling
A method of tying the King Sling using hemostats developed by Bruce E. Harang making properly tying the knot in fine tippet material much easier.
In general, whenever you tie knots in mono-filament you need to thoroughly wet the knot and draw it up with a single smooth tightening motion. This applies whether the monofilament is nylon, fluorocarbon, or any other monofilament polymer or co-polymer.
The following discussion and knot selection is for freshwater fishing. In saltwater there are several alternative knots, which are, in some cases, more suitable.
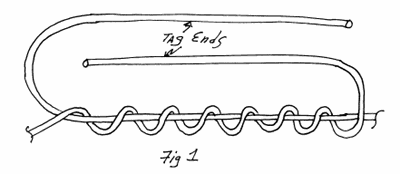
The knot is started in the same manner whether or not you are using a set of forceps to assist with tying the knot.
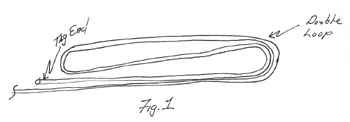
Form a double loop at the end of the line by folding the end of the line back on itself forming a loop. Then fold the loop back on itself forming a second loop. Grasp this second loop with your forceps (the forceps are not shown in these images but you should be able to understand how to use them to tie the knot from these images and the written description). See Figure 1 below
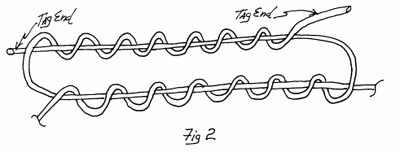
Now rotate the second loop end and the forceps around the double line three times. See Figure 2 below.
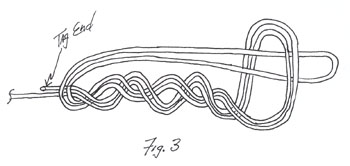
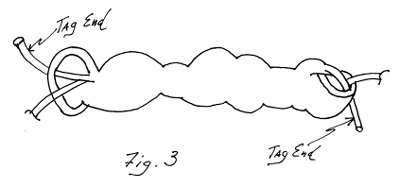
Next, push the second loop and the forceps holding the second loop through the first loop. Then release and withdraw the forceps leaving the second loop extending through the first loop. See Figure 3 below. Note: you can also reverse the procedure by placing the closed forceps through the first loop and then grasping the second loop, wrapping the forceps and grasped loop around the standing line and tag three times. Finally, draw the forceps out of the first loop along with the second loop.
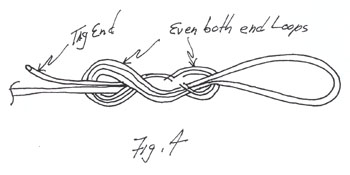
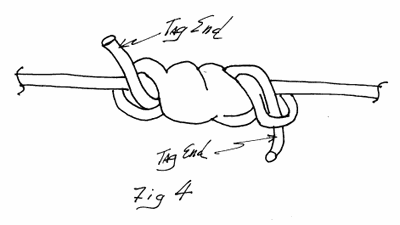
Wet the knot and using one hand to pull the single loop and the other to pull both the standing line and the tag end start to draw the knot tight. Once the knot forms, even out the knot loops on each end of the knot itself. See Figure 4 below.
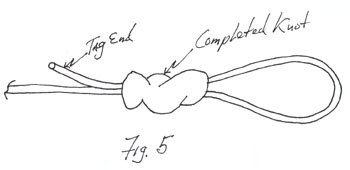
Finally, complete drawing the knot tight. Clip the tag end leaving a short stub and the loop knot is complete. See Figure 5 below. Note that in Figure 5 the tag has not yet been cut off.
This is one of the strongest, safest loop forming knots in the fly fisherman’s arsenal. Learn to tie this easy loop knot and you won’t loose fish to failed loops. I have tied this loop knot in monofilament up to 50 lb. Breaking strength with a diameter of 0.028" with no problems getting the knot to tighten. |
|
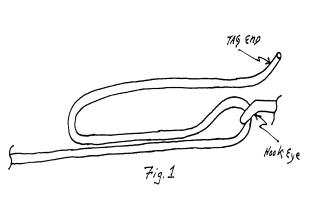
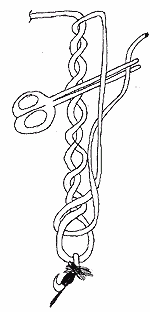
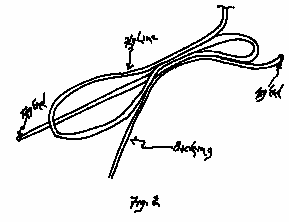
The Eugene Bend
A method of tying the Eugene Bend using hemostats developed by Bruce E. Harang so as to make properly tying the knot in fine tippet material much easier.
In general, whenever you tie knots in mono-filament you need to thoroughly wet the knot and draw it up with a single smooth tightening motion. This applies whether the monofilament is nylon, fluorocarbon, or any other monofilament polymer or co-polymer.
The following discussion and knot selection is for freshwater fishing. In saltwater there are several alternative knots, which are, in some cases, more suitable.
The knot is started in the same manner whether or not you are using a set of forceps to assist with tying the knot. Start the knot by running the tippet end through the hook eye and back up the line. Form a second loop in the opposite direction with the tag. Hold the tag end and the hook eye between your fingers (Fig. 1).
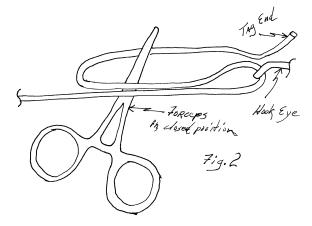
Insert a closed pair of forceps through the second loop and rotate the closed ends of the forceps around the standing line three times. This automatically also wraps the second loop around the standing line three times (Fig.2).
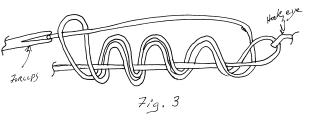
Now grasp the tag end of the tippet with the forceps and pull the forceps out of the second loop thereby pulling the tag end of the tippet through the second loop (Fig. 3).
Pull the tag end until the end loops of the knot are small enough that they cannot slip over the hook eye. The knot should be snug, but not tight, and should be located several inches above the hook eye (Fig. 4).
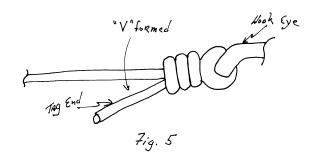
Wet the knot to lubricate it and protect the monofilament from frictional heat damage. Then with a smooth steady motion, pull the standing line until the knot slides down the standing line to the hook eye and seats. You will know the knot is properly seated when you hear and feel the knot click into position. In addition, a properly tied and seated knot will have the tag end forming a very pronounced V with the standing line (Fig.5).
The knot works best with monofilament lines of about 12 pounds breaking strength or less. It also works better with soft lines than with hard stiff lines.
By using a pair of forceps (hemostats) to assist with tying the knot you will find changing flies with very light tippet and tying with wet hands to be far easier and the cause of many fewer impolite words on stream.
|
|
|
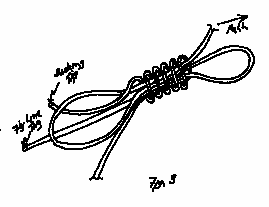
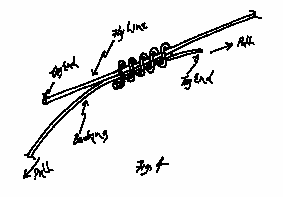
Quick, or Simple, Blood Knot
While this knot has been known as the quick blood knot or simple blood knot, it is not a blood knot because the tag ends come out the ends of the knot instead of in the center as they do in a true blood knot. It is, however, easy to tie, and very effective. The only drawback over the true blood knot is the bulk of the knot.
Wrap the tag end of one line seven or eight turns around the tag end of the second line (see Fig. 1) to start the knot.
Next the tag end of the second line is wrapped around the tag end of the first line seven or eight times (see Fig. 2).
To tighten the knot, grasp the tag ends and slowly draw the knot up until the tag ends stand out at right angles to the knot. Do not draw the knot so tight that the length of the knot is less than about 5/16 inch long (see Fig. 3).
Next wet the knot and grasping the two standing lines pull quickly and firmly to tighten the knot (see Fig. 4).
|
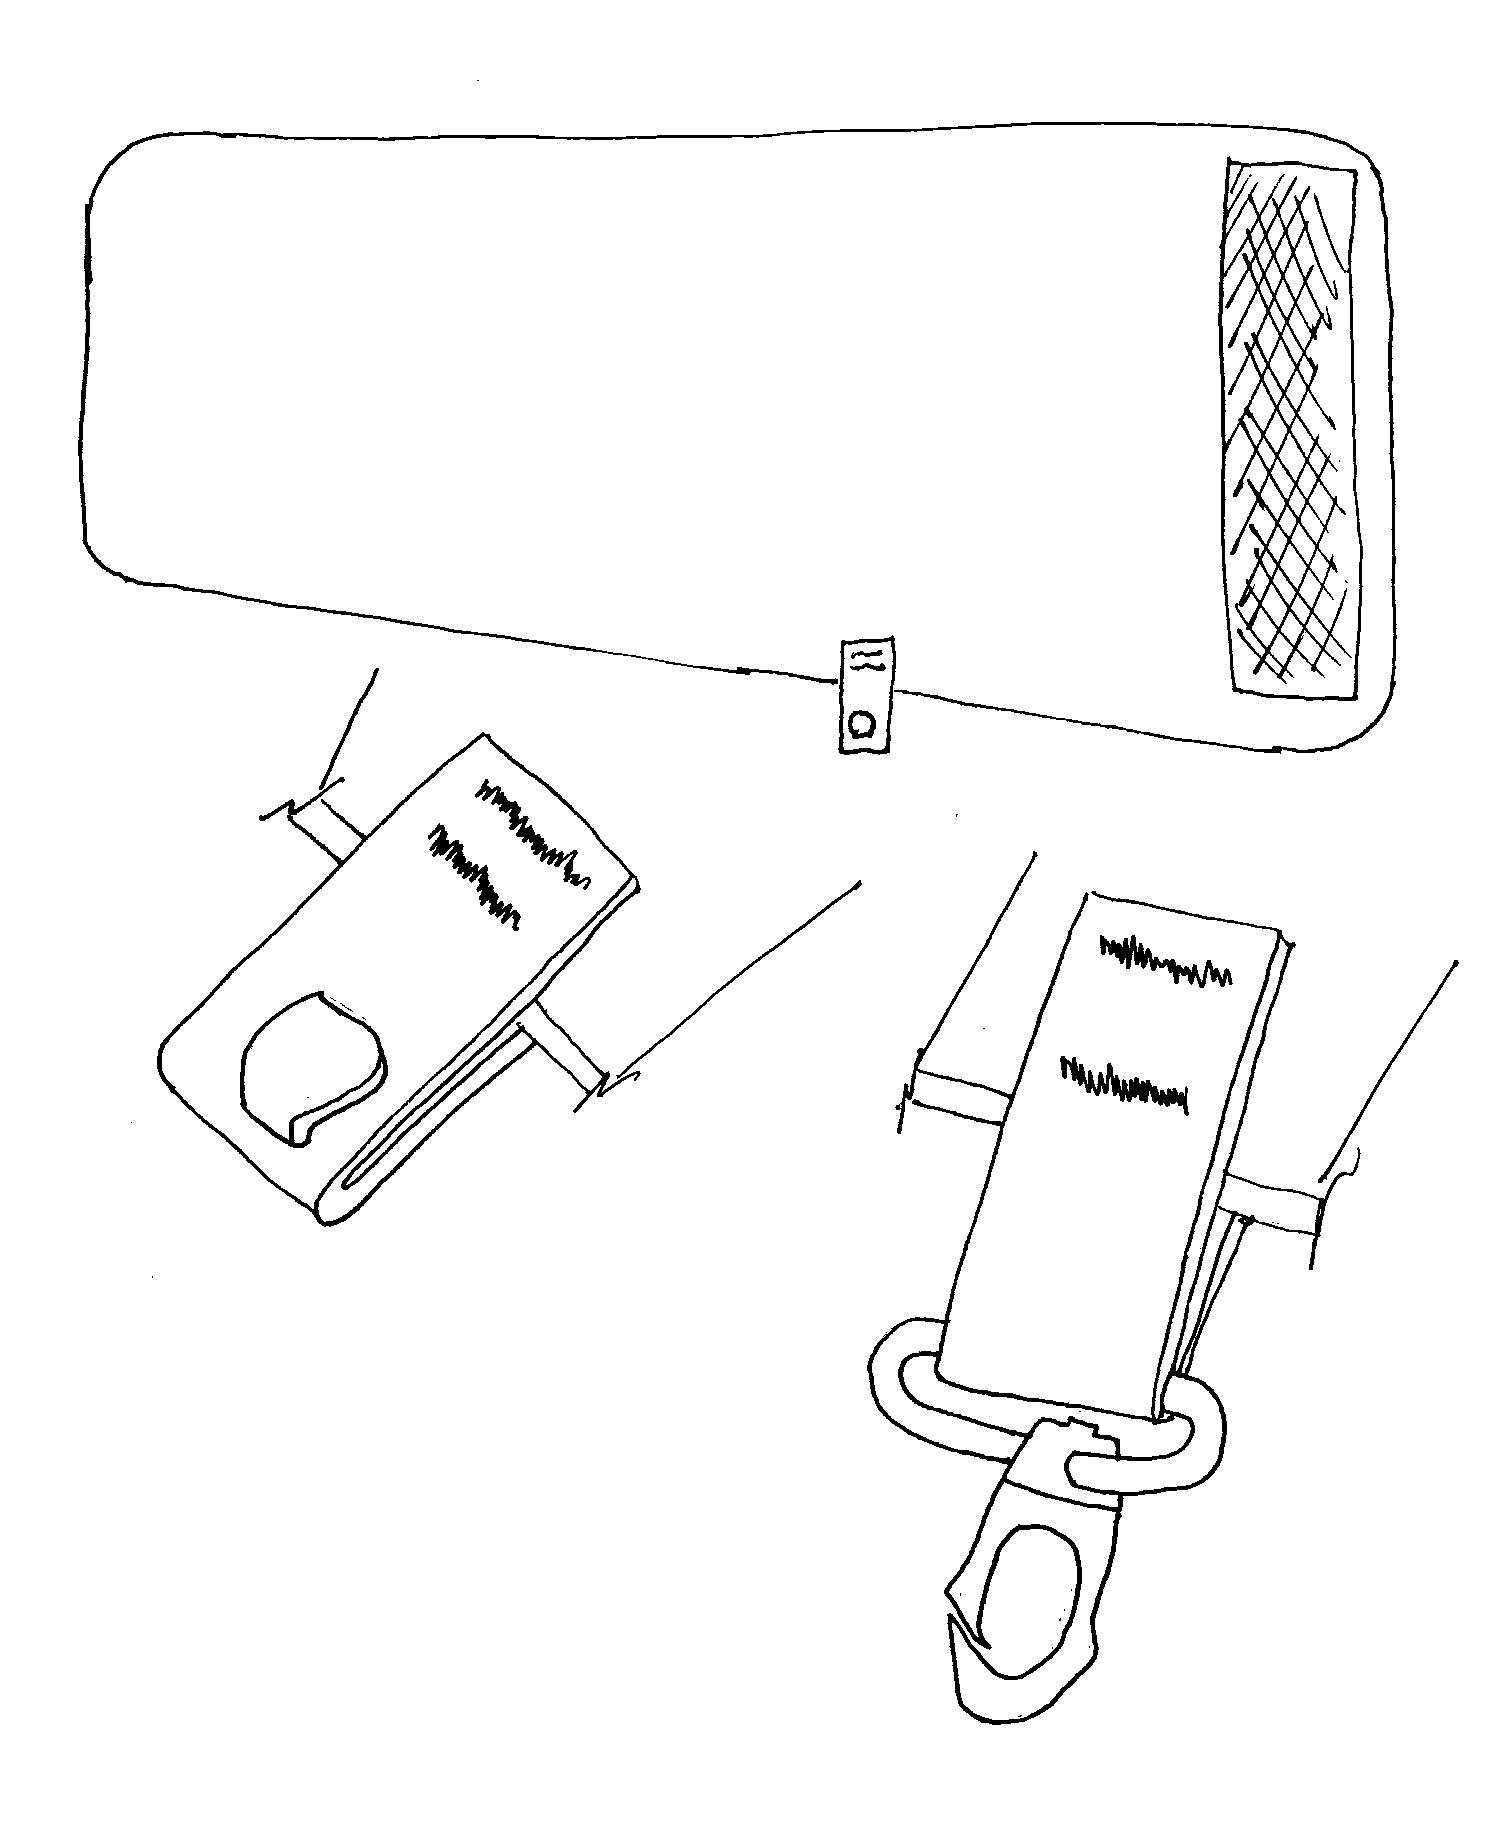
Lamson Reel Weighting to Balance a Spey Rod
Many modern large Spey rod sized reels are simply too light to balance 15 foot or longer rods and some of the older rods that were heavier than the modern 12 to 14 foot Spey rods on the market today. While this is not really a problem when casting two-handed it is very tiring and uncomfortable while fishing out the swing when the fly is in the water. To correct this I devised a means of changing the reel weight by adding brass weights made to slip on and off of the Lamson LiteSpeed reel center hub. Weights up to about 10 oz. can be used without interfering with the normal working of the reel and various sized weights can be interchanged or completely removed easily without in any way modifying the reel itself. Pictured are 4 oz. and 5 oz. weights I use to properly balance my RL Winston Derek Brown Favorite Spey rods.

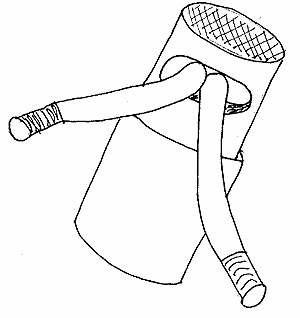
Gaiter Saving Tip
My favorite gaiters for use when wading are made of neoprene and utilize a Velcro brand fasting system. They are easy to put on and take off even when your hands are cold and numb. However, after losing one in fast water I was reminded quite graphically that neoprene floats. And after having to shell out another $25 dollars for a new pair I decided that the boot speed lace hook put on by the manufacturer had to be replaced by a better security system. With this in mind I stopped in at the local outdoor shop which carries camping and packing supplies. There I found some small engineered material (graphite filled nylon or some such) snap swivel clips. A pair of these and a foot of nylon webbing of suitable size for the clip loops cost a mere $2.35 plus sales tax.
At home I used a seam ripper to remove the nylon webbing holding the boot speed lace clip from each gaiter. Then I cut and melted two pieces of the nylon webbing to provide a loop about the same size as the original from the one foot strip. I placed one snap on each piece of webbing and used a standard home sewing machine to stitch the nylon webbing onto each gaiter in the same location as the old webbing.
Now when I put on the gaiters I snap them onto my boot lace at the toe of the wading boot and even if the closure lets go or is torn open the gaiter is locked to my wading boot. This will also work for any other style of gaiter which opens into a single layer of material.
The illustration below will give you all the information you need to make this simple improvement on your neoprene gaiters. Hopefully, you will try this before having to spend $25.00 to replace one lost gaiter.
© 1998, Bruce E. Harang
Tying the Clinch and Improved Clinch Knots Tip
by Bruce E. Harang
Clinch Knot
| I prefer to attach my fly to the tippet using a clinch knot or an improved clinch knot. Tying these knots in fine tippet, especially in the rain, can be a frustrating exercise. To solve this, there are available a number of special tools to do just this job. My fishing vest already weighs in at a quarter ton. So another tool attached to it is out of the question.
After reviewing what I already carried that might serve, I realized that my hemostats could do the job. Tying the clinch knot is remarkably simple using hemostats (see illustrations below).
|
|
If you do not draw on the tag end when tightening the knot, you produce a perfect clinch knot every time. If you do draw the knot tight by pulling on the tag end, you roll the knot over itself and the knot will cut the tippet like a hot knife. This is true no matter whether you use only your hands or a tying tool.
I have now used this method for over 7 years very successfully and without knot failure.
© 1998, Bruce E. Harang
Improved Clinch Knot
But how could I tie the improved clinch using my hemostats? The answer evaded me for a long time. Then, while tying a clinch knot during a day on the water, the answer leaped out at me. Instead of releasing the tag end from the hemostat jaws after drawing it through the first loop, continue to hold the tag end and push the hemostat jaws through the new (second) loop formed by drawing the tag through the first loop. Now release the tag end from the hemostat jaws and withdraw the jaws. As with the clinch knot, hold the tag end and the fly in one hand and draw the knot tight after wetting by pulling on the standing end of the tippet. Having used this procedure for over two years now I have found no problems with tying perfect improved clinch knots. See the diagram for a visual explanation.
These procedures are also very helpful for tying these same knots in heavy stiff leader materials more commonly used in saltwater fly fishing.
© 1998, Bruce E. Harang
Boot Lace Tip
by Bruce E. Harang
Here is a method to "tie" your wading bootlaces without the need to tie and untie knots. Place a small plastic spring-loaded closure (used on stuff sack draw cords) on your bootlaces. This will hold the laces tight while you are fishing and allow quick easy "untying" of the wet (frozen) laces at the end of the day. Even cold frozen fingers have no trouble releasing your laces using this method.
Total cost is about $2.00 for the pair of closures you will need. These are readily available at most camping/hiking shops.
|
|
© 1998, Bruce E. Harang
|
|
30 Second Nail Knot
If you are like me, tying a nail knot is a chore you experience as seldom as possible. Getting the knack of holding the fly line, the backing line or leader butt and a hollow tube while at the same time winding the backing or leader around the fly line is a never ending source of frustration. Well, there is a solution. Joe Dion of Orvis has devised a method of tying a nail knot which produces a real nail knot without the need of a tube. Further, you don’t have to wind things back upon themselves or turn things inside out. Orvis representative Leigh Oliva showed me how to tie the nail knot using this novel method.
Give this one a try, it is simplicity itself. This is so easy you can actually tie the nail knot on the stream in less time than it takes to tie a blood knot. The following figures clearly show how to tie the nail knot using the Joe Dion method in 30 seconds.
The Orvis Company has given permission for the free use of the method and knot.
The copyright protected drawings of Bruce E. Harang may be freely used for non-commercial purposes as long as the original copyright notice is included and each set of drawings is used together as a unit.
30 Second Nail Knot — Joe Dion Method
© 1995 Bruce E. Harang
|
|
|
| |
Leaders Get No Respect
Dry Fly Leaders
Until recently most dry fly leaders were constructed using the George Harvey style or formula. George Harvey developed this style of leader in the 1940’s and they still work well today. This style of leader construction does not allow the leader to straighten out completely when cast. Instead the leader lands on the water with a series of S curves. That is, it partially collapses at the end of the cast. This is the critical thing necessary to allow for the dry fly to have a drag free float. The fly is floating naturally, without drag induced by the conflicting currents between the fly and the angler, during the time it takes for the S curves to be straightened out. This was a major step forward for dry fly fishing. However, to create such leaders you must use numerous short pieces of monofilament of differing diameters. This in turn requires a multitude of blood knots in each leader. A few George Harvey style leader formulae are given below to illustrate. They are good leaders for dry fly fishing and worth the time to tie and take fishing.
George Harvey Style Dry Fly Leaders
For size 20 and smaller flies:
10 Foot Leader:
Butt: 48” of 0.019-inch
Mid-section: 18” of 0.015-inch
12” of 0.013-inch
6” of 0.011-inch
6” of 0.009-inch
6” of 0.007-inch
Tippet: 24” of 0.005-inch
12 Foot Leader:
Butt: 54” of 0.021-inch
24” of 0.017-inch
Mid-section: 12” of 0.013-inch
10” of 0.011-inch
6” of 0.007-inch
Tippet: 6” of 0.005-inch
24” of 0.004-inch
A new way of looking at dry fly leader design came from the fertile mind of Gary Borger and was published in his fly-fishing system approach book Presentation in 1995. What Gary Borger found was that he could achieve the required S curves in a dry fly leader during casting without having to tie so many individual pieces of monofilament together. As a consequence there were far fewer blood knots to tie. As you see from the Gary Borger leader formulae below the leaders consist of a butt section, one or two midsections, and a tippet section. Thus, you are only required to tie two or three blood knots for each leader. These leaders work equally as well as the George Harvey style, but with a lot less blood letting by the person tying the blood knots.
Gary Borger Style Dry Fly Leaders
Size 10 through 14 flies:
Butt: 48” of 0.013-inch
Mid-section: 12” of 0.010-inch
Tippet: 48” of 0.007-inch (4X)
Size 20 and smaller:
Butt: 12” of 0.013-inch
Mid-section: 48” of 0.010-inch
48” of 0.007-inch
Tippet: 12” of 0.004 or 0.005-inch
The basis for the Gary Borger dry fly leader is the fact that it is not necessary to have no more than a 0.002-inch diameter difference between pieces of leader material in order to have the leader turn over. In deed, what Gary found was that the cross-sectional area of the leader can be reduced by 60 percent and the leader will not hinge, but will turn the leader over properly. Gary points out that a 60 percent reduction in cross-section area is the same as a 35 percent reduction in diameter.
“So, instead of instead of stepping a leader down from 0.020, to 0.018, to 0.016, to 0.014, to 0.012, to 0.010 inch, the fly fisher can step down from 0.020 to 0.013 to 0.008. (Multiply the size of the material by 0.65 (65%) to get the next smaller size that you can use; for example, 0.020 x 0.65 = 0.013).” (see Presentation, p.181).
When you use this 60 percent reduction method you must modify the way you tie the blood knot. Gary Borger explains, “But if there’s more than 0.002 inch difference between the two pieces of material being joined, then the Blood Knot tends to slip”. (see Presentation, p.187). The answer is Gary’s 5/7 Blood Knot. “Instead of making 5 turns with each end of the material, the angler ties the knot using 5 turns with the heavy material and 7 turns with the light material. … The extra turns with the lighter material produces a knot that pulls up evenly; each side slides tight at the same rate and the knot forms perfectly. It’s the same length from the center to either end of the knot.” (see Presentation, p.188).
In both styles of construction, the tippet needs to be made using a very soft, or limp, monofilament material. This will allow the leader to produce the S curves that you are trying to produce when casting a dry fly.
Give both of these dry fly leader construction styles a go. Tie a few of each and fish them each a bit. See what works best for your style of casting and fishing and then stick with that formula. Remember however, that when the fishing conditions change, or the size of the fly changes, you need to think about the leader required to turn over that fly under those conditions, and still achieve a drag free float.
Next we will finish dry fly leader design with comments by my friend Paul Beebe, concerning leader tapers.
"Most knotted leaders (is there another kind?) are built with ratios of butt-to-mid-to-tippet lengths of 50-25-25 or 60-20-20. Essentially, these ratios are the same. So the one you use is a matter of personal preference to best suit your casting style. However, 50-25-25 leaders can be made with long tippets from more subtle material to give drag free drifts of dry flies. In addition, with the Bloody Quick knot used to join sections, it is not necessary to have small diameter changes between sections (say, 0.002 or 0.003 inch). Rather, you can join sections with diameters different by as much as 0.005 to 0.007 inch. So, a basic 10-foot, 5X dry-fly leader is made from 5 feet of 0.020 inch diameter, 2.5 feet of 0.015 inch diameter, 1 foot of 0.010 inch diameter, and lastly 1.5 feet of 0.006 inch diameter material. This is simple and quick, and very similar to the Uni-Body Leaders of Gary Borger but with better knot confidence.
You could just as well call that portion of the leader from the 0.020-inch diameter to the 0.010-inch diameter, a base section onto which you add your proper tippet section. I use Maxima Chameleon material for all sections but the tippet section. I use Umpqua or Climax for the tippet section. More from habit than anything else, I continue to use a 48-inch butt section of 0.022, 0.020, or 0.017 inch diameter Maxima. This is followed by a 30-inch section of 0.015-inch diameter Maxima and an 18-inch section of 0.010-inch diameter Maxima as a base leader or base section. Some may think that 0.020-inch diameter is too stiff for a 5-weight line, and, for some people and rods, it might be. However, my rods are first generation Winston Graphite, and they are slow and difficult to cast without closing the loop. A stiffer material like Maxima helps to get the loop open near the end of the line. Again, this is my personal style and casting stroke. Someone else might alter the leader material or use slightly different proportions. However, in most all leaders, you will find the proportions are invariably just about 50-25-25 or 60-20-20.
A final note, most leader material measures 0.001-inch diameter larger than labeled. All leader material, Maxima included, is extruded in metric sizes and then converted (incorrectly too) to non-metric sizes. Thus, don't be too concerned about the uneven graduations in Maxima labels; say from 0.022 to 0.020 to 0.017 inches in diameter. Those sizes are actually 0.55, 0.50, and 0.45 mm diameter."
As you can see, Paul has opened a completely new facet to tying your own leaders. You can tailor a leader to your personal casting style, or the casting characteristics of your fly rod, or both. This is something almost impossible to do with commercially manufactured leaders.
A final comment about dry fly leaders, in an article by a well-known commercial fly tyer on dry fly leader construction, he stated that you couldn't produce a proper dry fly leader unless you use only 0.001-inch diameter changes between sections. I will sum up my thoughts on this idea in the words of a famous member of the British Foreign Service, "RUBBISH!" Even if you could get monofilament in 0.001-inch diameter size differences, which you cannot, you simply end up with a series of knots strung together with pieces of monofilament. For example using this idea would produce a George Harvey style 10 foot, 6X dry fly leader having 17 knots!
Now we turn to leaders that are designed for nymph and wet fly fishing. In dry fly fishing, we need the leader to collapse over some portion of the tippet end to provide the slack necessary to allow some period of drag free float of the fly. In nymph fishing, on the other hand, we need the leader to tell us were to look for our fly. Why is this so? In nymph and wet fly fishing the fly is under water and not visible to us in most instances. We must instead concentrate on where the fly is underwater and watch it with our mind’s eye. If the leader partially collapses into coils of slack we cannot determine where the fly, which is out of sight, is in the stream. Ideally, we want the leader to extend in a straight line directly out from the end of the fly line. Then we are able to concentrate on watching the correct area in the stream to detect the strike of a fish. In many forms of nymph fishing the use of a strike indicator of some type can be helpful. Nevertheless, do not be lulled into thinking that watching the strike indicator will make you a good nymph fisherman. It will not. I can personally attest to the fact that bass and walleye, for example, can, and do, suck in a lure and expel it without ever causing a strike indicator to move. While I have not fished under conditions where I could watch the trout, I do not doubt they too do take far more lures than we ever realize. Nymph fishing means spending long periods concentrating on our unseen fly interspersed with short periods of adrenaline rushes when we raise our rod and a fish is on. The intense concentration on where our sunken fly is tells us when to raise our rod to receive the adrenaline rush! If your attention span is no longer than the 20-second sound bites on the evening news you will never be very successful nymph fishing, no matter how many strike indicators you use.
How do we construct a leader that will allow the best presentation of a sunken fly while providing us with the best detection ability? First, we use a relatively stiff material throughout the leader. This means that the tippet is stiff enough so that it will not collapse when casting a nymph. Instead it will turn over the nymph and push it straight out from the fly line. It becomes an extension of the fly line all the way out to the fly itself. One of the best leader materials to accomplish this is Maxima chameleon brand monofilament. This particular material has the correct stiffness even in the 7X size for nymph leaders. Additionally, it is very abrasion-resistant and has great knot strength.
Leader formulae for nymph leaders are somewhat more simplistic than comparable dry fly leader formulae. The following nymph fishing leader recipes will give you a good starting point as well as several very good nymph-fishing leaders. Both recipes are from Gary Borger. Four feet of 0.020” diameter, one foot of 0.013” diameter, four feet of 2X, and 6” to 8” of 5X monofilament. This is a good leader when we use lead to get the fly down deep quickly. Attach the lead just about the knot between the 2X and the 5X material. When not using lead or for use with streamers try four feet of 0.020” diameter, 1 foot of 0.013” diameter, two feet of 2X, and one foot of 5X. This leader will turn over the fly straightened out and ready to fish as soon as the fly hits the water. All material used for these leaders is Maxima Chameleon brand monofilament.
© 1998 & 2004 Bruce E Harang
|