|
||
|
|
||
|
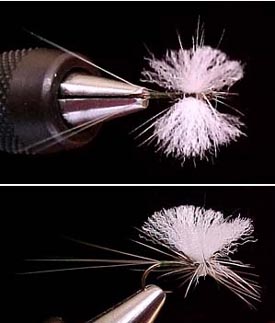
Footprint Fly Style û Ephemeroptera (RWU
Dun û Right Way Up Hook Dun) By L. T. ThreadgoldMaterials: With Two WingsTying
Instructions: 1.
Place the appropriate sized hook in the vise. 2.
Choose an appropriate colored thread, tie on one hook eye length behind
the eye and wind the thread rearward to slightly beyond the beginning of the
bend and then forward back to the start of the bend of the hook. 3.
Using four BettsÆ tailing fibers tie them in at the point where the
bend starts and split them into two pairs of fibers with approximately 90
degrees separation between the two pairs. These tail fibers are essential
features of this style of tying as they ensure the fly alights upright
consistently. If the fly tier finds his flies with two pairs of BettsÆ tailing
fibers do not consistently land upright when tested or in use, then he should
increase the number of BettsÆ fibers to three or more on each side and again
establish a large angle between the bunches. With an increasing number of
tailing fibers the fly will descend more and more slowly. With eight or ten
tailing fibers it is unnecessary to divide them into two bunches, descent will
be measured, and the fly will alight gently on the water. It is best to limit
the number of BettsÆ tailing fibers to the lowest number which consistently
gives upright landing. 4.
If a rib is going to be used, tie in the ribbing material now. 5.
Either use the tying thread to form a body if you wish it to be very slim
or dub a length of synthetic dubbing onto the thread for a more substantial body
and thorax. The dubbed thorax helps to set the hackle and hold it in the desired
position. Dub the body to the eye of the hook, wrap the rib to the eye of the
hook and tie off both and cut off the excess. 6.
Cut a short strip of poly yarn of a color appropriate to the fly species
being copied. Avoid white that is too stark and looks unnatural. Preferred
colors are beige and gray. A piece of yarn about 1 inch long is about right and
the piece should not be too thick. The wings are placed just anterior to the
middle of the body and tied in using a figure-of-eight tying. A drop of thinned
Flexament is placed in the center to fix them to the body. Do not use too thick
a piece of poly yarn that will appear unnatural. Let the thread hang immediately
in front of the wings. 7.
Place the wings in a gallows tool. 8.
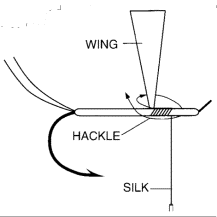
Choose a hackle by spreading its fibers at a right angle to the shaft and
measuring it against the hook by placing the shaft in line with the wings. The
hackle fibers should be long enough to project just beyond the hook bend. Hackle
fibers about 5 û 6 mm long are about right for a size 16 hook, for example.
Tie in the hackle immediately in front of the wings with the butt facing towards
the eye and the hackle curvature upwards. Trim off the butt. 9.
Wind the thread halfway to the eye and leave the bobbin hanging. 10.
Using hackle pliers wind the hackle around the back of the wings, then
forward under the hook shaft, round the tying thread and back to the rear of the
wings again, so forming the front ôfeetö. 11.
Take the hackle round the front of the base of the wings again and then
backwards underneath towards the barb, making sure the hackle lie at an oblique
angle. Repeat this two or three times, ensuring that each turn lies behind the
previous one. Two turns should be sufficient for size 16 and 18 hooks. The last
turn should ensure the hackle fibers project beyond the hook bend. (With larger
hooks, 12 and 14, make sure the wings are tied in halfway or only slightly in
front of halfway along the hook shank so that the hackle fibers project at least
to the hook bend. Hackle fibers about 7 û 8 mm should suffice and support the
barb above the water even if they do not project beyond the barb itself. If this
tactic does not succeed then it may be necessary to use a longer hackle and more
turns to provide more ôfeetö). Bring the hackle round the front of the wing
again and let the hackle pliers hang down on the near side of the hook shank,
close to the eye.
12.
Take the tying thread round the back of the hackle and using a half-hitch
tool tie it in; repeat this three times making sure not to trap any hackle
fibers pointing forwards. The latter is best accomplished by making sure the
half-hitch tool and the tying thread are in line with the hook length. 13.
Trim off the hackle and if you wish add some more thread to the head
using the half-hitch tool. Cut the thread. 14.
Trim off the hackle fibers above the horizontal so as to reveal the body
color. This is relatively easy if the wing is left in the gallows tool but moved
backwards, forwards and sideways with the finger as necessary. This is not an
essential step but one I prefer. 15.
Trim the wings to length depending on the size of hook; anything between
0.5 cm and 1 cm is usually about right. This is best done while the wings are
still held in the gallows tool. Place a spot of thinned Flexament between and
round the wings to ensure they stay apart and the hackle is locked in. Round off
the tips of the wings. Larger wings need stiffening with thinned Flexament over
the basal region of each wing and all wings should be stiffened by being stroked
between the thumb and forefinger on which a drop of thinned Flexament has been
spread. Before the glue sets, the wings should be combed with a needle to spread
their tips and make them less dense. 16.
Place a spot of head cement on the head. 17.
Treat the fly with a liquid silicone floatant and allow to dry. 18.
When viewed from below the hackle should form a series of radiating
spokes. Any hackle fibers projecting directly downward should be removed. The
fly should sit firmly on the tying bench, level or with the head slightly tilted
downwards and the hook point should be clear of the surface. From the front or
back the fly should sit level; if not either spread the hackle fibers or remove
the offending ones. On the water the fly should sit more or less level with the
hook clear of the surface. With One WingTying
Instructions: 1.
Follow steps 1 to 4 of the dun with two wings. 2.
Only one wing can be used, since when at rest on the water the dunÆs
wings are often virtually together and from certain angles may appear as a
single structure. Form a wing by cutting a length of poly yarn of the
appropriate color for the species of dun being imitated, then tie in the yarn
starting a little way behind the eye and continue winding the thread backwards
to just before halfway, so forming a thorax. 3.
Tie in a hackle immediately in front of the wing with the butt facing
along the length of the hook towards the eye, and the hackle curvature upwards.
Trim off the butt. 4.
Wind the thread halfway to the eye and leave the bobbin hanging. 5.
Hold the wing taut and upright in a gallows tool. 6.
Wind the hackle as in steps 11 to 15 of the dun with two wings pattern. 7.
Cut the wing to between 0.5 û 1 cm depending on the size of the hook.
Shape the tip of the wing to give a rounded outline and place a drop of thinned
Flexament round the base of the wing to lick in the hackle. 8. Follow steps 17 to 19 in the instructions for the dun with two wings. Egg-laying DunTying
Instructions: This
pattern is tied as for the dun with two wings except for two essential
differences, namely: 1.
Take the thread about a third of the way round the bend of the hook and
tie in a thin strand of green poly yarn. Form a small egg ball with the green
yarn. Tie off and trim. An alternative is to use yellow or mother-of-pearl
Krystal Flash to form the egg ball. 2.
When tying in the wings place them slightly forwards of the normal
position for the dun pattern, or leave the wings in their usual position but use
a hackle shorter than normal, i.e. one which does not extend beyond the hook
bend. Reverse the normal winding sequence, that is wind the hackle as described
for the dun but form the front ôlegsö with two turns underneath to the front
and only one underneath to the rear. These methods should result in the bend of
the hook dipping into the water, where the trout should see the abdomen and egg
ball. Check that the fly does sit ôtail downö by placing it on the water
after treating the hackles to float but not the egg ball. If the fly does not
sit tail down, move the wings slightly further forward in the next tying. SpinnerTying
Instructions: 1.
Hook size 12 to 18 depending on species to be imitated, 12 û 14 for
large flies such as green drakes or march brown, 16 û 18 for small to medium
flies such as BWOÆs. 2.
Place the hook in the vise RWU. 3.
Use a color of thread appropriate to the species being imitated and wind
it down the shank and part way round the bend. Return the thread to the end of
the shank, and tie in two or three BettsÆ tailing fibers. The balancing
properties of the tails are not so important in this pattern, since it does not
matter which way up the spinner lands, though this will normally be hook point
down. Make sure the tails are wide apart and in line with the shank of the hook,
so that they will lie on the water surface when cast. 4.
Tie in Benecchi dubbing of the appropriate color. At this point there are
two possible patterns, those with a body and thorax of a single color
(mono-color body) and those with a light-colored body and a dark thorax (bicolor
body). The reason for the bicolor body is that many of the smaller species, but
not all, have a thorax that is darker than the abdomen. Others have a virtually
uniform body color, usually yellowish or whitish. In my experience both bicolor
and mono-color forms seem to work equally well. Poly yarn can be used as an
alternative for the body. 5.
Take the thread back from the eye a short distance and tie in poly yarn
wings using a figure-of-eight tying. White yarn is appropriate for spinners
since most spinner wings are translucent. Take the thread to the eye, form a
head and tie off. 6.
Place a drop of thinned Flexament on the center of the wing tying and
spread a little up each wing with a needle. This strengthens the roots of the
wings but be sure to confine the glue to the wing base. 7.
Trim the wings so that each is about the same length as the body but be
sure that they are not so long as to catch in the hook bend. Round the ends and
spread the fibers by combing with a needle; the wings should be
semi-translucent. Stiffen the wings by stroking them with thinned Flexament
spread between finger and thumb but make sure the fibers do not bunch together
again; if they do, then comb them again before the glue dries. A correct light
signal will not occur unless the wings are separated into thin fibers, so
combing is very important for the success of this patter. 8.
Treat with floatant. When placed on the water the spinner should lie with
the tails, wings and body on or slightly in, the surface film. Legs to not seem
necessary in my experience, though doubtless trout see these in the natural.
Perhaps the reason that the absence of the dark lines of the legs is not missed
by the trout is because of the characteristic large sparkling cross the pattern
produces. However, if the fisherman requires them, then a hackle can be tied in
after the wings. Tie in the hackle in front of the wing, and take it in a
figure-of-eight pattern round the wings. Tie off and trim away all hackle fibers
except those projecting laterally. Testing
the Fly: The
procedure below applies to both the dun with two wings and with one. 1.
Drop the fly from about 4 û 5 feet above a carpet. It should float down
with the wing(s) uppermost. It may rotate a little but provided the rotation is
slow, it does not seem to matter when actually casting at the waterside. The fly
should bounce on the carpet and stay upright. The single wing pattern does not
land upright as consistently as the two-winged variety if both have the same
number of BettsÆ tailing fibers. Consequently, it may prove necessary to
increase the number of tails with the single wing variety. If either pattern
repeatedly lands on its side or upside down, this may be due to any one or more
of the following factors: A
The wing(s) is (are) too long. B
If the wing(s) seem of the right length, then move the tails further
apart and re-glue. As stated previously, these tails act as balancers and also
ôpushö the fly upright if it lands sideways. Increase the number of tail
fibers in subsequent tying if necessary. C
Some hackle fibers are projecting vertically downwards. Remove them. 2. Place the fly on the water surface in a glass bowl. It should ride high but slightly head down and the hook point should be clear of the surface. Look at the fly from below and it should show the starburst footprint but no hackles should project through the surface film. If the fly persistently sits on settles down with the hook point below the water level, then the wing is too near the eye. Winding a hackle round a wing too far forward results in the radiating hackles not projecting backwards enough to support the hook point above the water. The propensity for hackles wound round wings close to the eye leading to barbs below the water, can be used to advantage in tying patterns to represent egg-laying females. Tips
on using Footprint Flies:
After a catch the fly should be dried
with amidou and then treated with floatant or drying powder. If the fly does not
continue to land upright after the first few casts then return it to the fly box
for further liquid floatant treatment at home and replace it with a new fly. Click the BACK button on your browser to return to the fly pattern index page. |
||